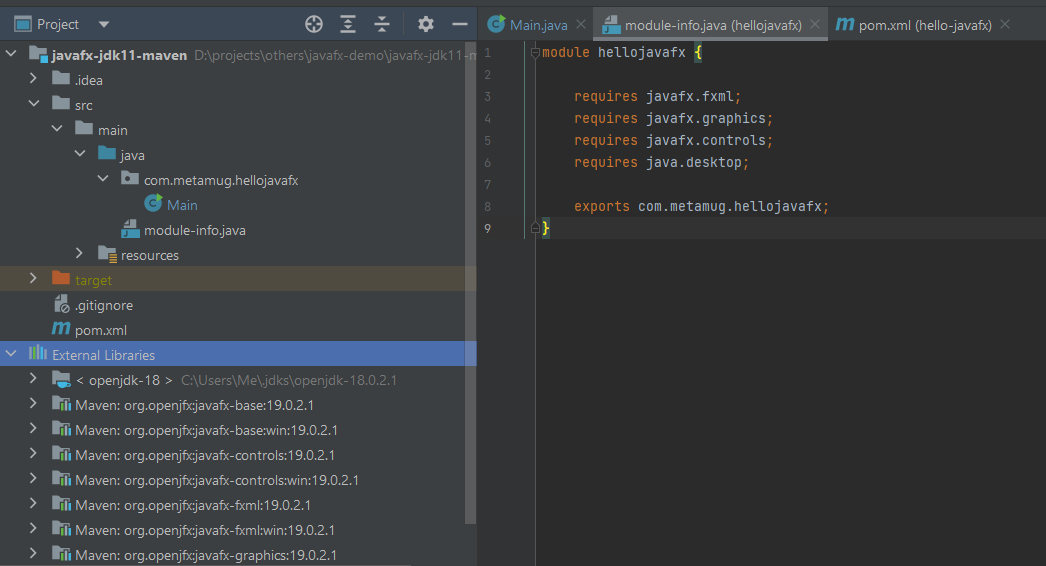
To set up a JavaFX project with Maven and Java 11, you can follow these steps:
Create a new Maven project in your IDE or via the command line with the following command:
mvn archetype:generate -DgroupId=com.metamug -DartifactId=my-project -DarchetypeArtifactId=maven-archetype-quickstart -DinteractiveMode=falseAdd the following dependencies to your project's pom.xml file:
 <dependencies>

        <dependency>
            <groupId>org.openjfx</groupId>
            <artifactId>javafx-fxml</artifactId>
            <version>19.0.2.1</version>
        </dependency>

        <dependency>
            <groupId>org.openjfx</groupId>
            <artifactId>javafx-controls</artifactId>
            <version>19.0.2.1</version>
        </dependency>

</dependencies>
Note that the version numbers might change over time, so make sure to check the latest version before adding the dependencies.
Add the following plugin to your pom.xml file to configure the JavaFX runtime:
 <build>
        <plugins>
            <plugin>
                <groupId>org.apache.maven.plugins</groupId>
                <artifactId>maven-compiler-plugin</artifactId>
                <version>3.8.0</version>
                <configuration>
                    <release>11</release>
                </configuration>
            </plugin>
            <plugin>
                <groupId>org.openjfx</groupId>
                <artifactId>javafx-maven-plugin</artifactId>
                <version>0.0.3</version>
                <configuration>
                    <mainClass>com.metamug.hellojavafx.Main</mainClass>
                    <options>
                        <option>-XX:+UseG1GC</option>
                        <option>--add-exports</option>
                        <option>javafx.base/com.sun.javafx.event=org.controlsfx.controls</option>
                    </options>
                </configuration>
            </plugin>
        </plugins>
    </build>
Note that the mainClass value should be set to the fully-qualified name of your main class.
Create a module-info.java file in your project's src/main/java directory with the following contents:
module hellojavafx {

    requires javafx.fxml;
    requires javafx.graphics;
    requires javafx.controls;
    requires java.desktop;

    exports com.metamug.hellojavafx;
}
Note that the module name should match the groupId value in your pom.xml file.
Create your JavaFX application as usual, using the javafx.* packages.
Finally, you can build and run your project with the following commands:
mvn clean javafx:runThis will compile and run your project, launching the JavaFX application.
The source is available on github
package com.metamug.hellojavafx;

import javafx.application.Application;
import javafx.event.EventHandler;
import javafx.scene.Group;
import javafx.scene.Scene;
import javafx.scene.input.MouseEvent;
import javafx.scene.layout.BorderPane;
import javafx.scene.paint.Color;
import javafx.scene.text.Font;
import javafx.scene.text.Text;
import javafx.stage.Stage;

/**
 * @author Deepak Mishra
 */
public class Main extends Application {

    private Stage primaryStage;

    /**
     * @return Object of type <code>Stage</code>
     */
    public Stage getPrimaryStage() {
        return this.primaryStage;
    }

    /**
     * @param primaryStage
     *            Sets primaryStage as Stage in Application
     */
    public void setPrimaryStage(Stage primaryStage) {
        this.primaryStage = primaryStage;
    }

    public static void main(String[] args) {
        Application.launch(args);
    }

    @Override
    public void start(Stage primaryStage) {

        Scene defaultScene = getDefaultScene("Click here to open");
        primaryStage.setTitle("To Do List");
        primaryStage.setScene(defaultScene);
        defaultScene.addEventFilter(MouseEvent.MOUSE_CLICKED, new EventHandler<MouseEvent>() {
            @Override
            public void handle(MouseEvent mouseEvent) {

                Scene toDoScene = changeScene("Hello JavaFX");
                Stage rootStage = getPrimaryStage();
                rootStage.setScene(toDoScene);
                rootStage.show();

            }
        });
        primaryStage.centerOnScreen();
        setPrimaryStage(primaryStage);
        primaryStage.setResizable(false);
        primaryStage.show();
    }

    /**
     * @param defaultText
     *  sets it as welcome String during start of Application
     * @return <code>Scene</code> object with <code>defaultText</code> displayed at its center.
     */
    public Scene getDefaultScene(String defaultText) {
        final Group rootGroup = new Group();
        final Scene scene = new Scene(rootGroup, 600, 400, Color.WHITE);

        // A temp variable is used just to get the bounds of defaultText after
        // setting its font and font size so that it can be positioned perfectly
        // on the screen at its center.
        Text temp = new Text(defaultText);
        temp.setFill(Color.BLACK);
        temp.setFont(Font.font(java.awt.Font.SANS_SERIF, 20));
        Text txtDefaultText = new Text(scene.getWidth() / 2 - ((temp.getBoundsInLocal().getMaxX() - temp.getBoundsInLocal().getMinX()) / 2),
                scene.getHeight() / 2, defaultText);
        txtDefaultText.setFill(Color.BLACK);
        txtDefaultText.setFont(Font.font(java.awt.Font.SANS_SERIF, 25));

        rootGroup.getChildren().add(txtDefaultText);

        return scene;
    }

    public Scene changeScene(String text) {
        BorderPane borderPane = new BorderPane();

        Text hello = new Text(text);
        borderPane.setCenter(hello);
        Scene scene = new Scene(borderPane, 600, 400, Color.YELLOW);
        return scene;
    }

}